Showing posts with label How To. Show all posts

Monday, December 3, 2012

Gift Wrapping Ideas Just in Time for Christmas

This weekend, I was asked if I had a video showing how to wrap a present in a gift bag without wrinkling the tissue paper. I didn't, so my husband helped me whip one up pretty fast.  I absolutely love gift wrapping, so I'm happy to share this quick tutorial.


This fall, I also had the opportunity to record a few professional videos for eHow.com on how to tie bows on presents.  My favorite bow to tie is a Puff Bow.  These bows make such a great impression, and the technique I use makes them much easier to tie than they may look.  The key is really to use wired-edge ribbon because you can bend it into shape.  This time of year you can get huge rolls of this in fun Christmas designs at craft stores.  I usually stock up after the holidays when they're on clearance.


How to Make a Puff Bow -- powered by ehow

Tulle Puff Bows are another favorite of mine.  At Christmas, I think a white tulle puff bow looks so pretty on snowflake wrapping paper in particular because these bows look like fluffy snowballs or snowflakes.


Tutorial for a Tulle Puff Bow -- powered by ehow

If you want to take your Tulle Puff Bow to the next level, here's an easy idea for adding a little raffia for texture.


Let me know if you have any gift wrapping questions this holiday season.  Maybe I can whip up a video just for you. Happy wrapping!

Tuesday, November 27, 2012

Countdown to Christmas :: Printable Advent Calendar

The excitement of opening an Advent Calendar surprise is something that never fades away.  The anticipation is still super fresh in my mind.  This year, I thought it would be fun to make my very own "Countdown to Christmas" Advent Calendar.  Here's how I created this fun and easy project.

Countdown to Christmas Advent Calendar

Countdown to Christmas Advent Calendar Supplies:

  • Chalkboard & chalk
    (You could use a bulletin board or a picture frame wrapped in wrapping paper instead.)
  • Push pins, tacks, or tape
  • Bakers' twine or string
  • Mini paper bags
  • Tiny clothespins (I had no clue these came in such an ity-bity size...love them!)
  • Ghirardelli chocolates (Caramel is our favorite flavor, but any little surprises will do.)
  • Printable Advent Calendar Numbers, designed by yours truly (just $2.50), cut into squares
Christmas Calendar Printable

Press push pins into the back side of your chalkboard or frame at even intervals to create five rows across. Thread bakers' twine or string around the chalkboard looping around each push pin to hold securely and tie ends.  Alternately, you could tape the twine or string onto the back of your chalkboard, but I'm not sure this would hold as securely.

Fill your mini paper bags with chocolates or other surprises, and fold the top of the bag over.  With the folded side facing the back, place a printable advent calendar number on top of the bag, and secure into place on your frame with a tiny clothespin.  I found the mini paper bags, chocolates, and tiny clothespins at Michael's...gotta love one-stop shopping!

Printable Christmas Countdown

Use chalk to personalize your Countdown to Christmas Advent Calendar.  I drew little holly leaves to coordinate with the design on the Printable Advent Calendar Numbers and put our family name at the bottom.

Starting on December 1, let the fun begin!  Since it's just me and my husband at our house, we take turns opening a number every day.  I get even numbers; he gets odds.  Then if family comes to visit, we usually let them open the last few numbers leading up to Christmas.  It's fun to share the joy!

Printable Advent Calendar

If you'd like to order the Printable Advent Calendar Numbers, they are available for instant download for just $2.50. You'll receive an email within a minute or two of purchase with instructions for downloading them.

What are some of the holiday traditions at your house?


Monday, August 20, 2012

Keeping the Party Perfection Monster Away

Are you afraid of the Party Perfection MonsterI am!  Luckily, I've learned some easy ways to keep him away, and I'm pleased to have them featured in Let's Party Magazine today.  Go check them out! 


Not sure what the Party Perfection Monster is? Head over to Let's Party Magazine...he may be haunting you.

I'm also thrilled to share my "Frazzled to Fabulous: How to Plan a Party to Remember" workshop again. I'll be at the Madison Public Library this Saturday, August 25 at 2:00 pm. If you're planning to attend, I'd love to know!  Please RSVP on Facebook.


Wednesday, July 25, 2012

How to Plan a Party Video Series

My Frazzled to Fabulous: How to Plan a Party to Remember workshop last Saturday was really well received by both party planning beginners and experts, which was a real treat to hear.  And, since I had a few requests, I decided to record an abbreviated version of the presentation to share.

I hope you enjoy the tips in this three-part video series:
  • Daydream (Part 1)
  • Lists, Lists, & More Lists (Part 2)
  • Seem Effortless (Part 3)
You'll learn how to remove the stress and uncertainty from planning a party, so you can become a graceful and effortless hostess. Are you ready to go from Frazzled to Fabulous?


I'd love to know what you think!

Wednesday, July 11, 2012

Frazzled to Fabulous: How to Plan a Party to Remember

Do you love the idea of hosting a party but get discouraged when it comes to pulling all the details together? No need to feel frazzled! 

UPDATE: Watch the three-part How to Plan a Party video series of this presentation on YouTube. 
 
I'll be presenting my favorite tips that make party planning fun and stress-free at the Huntsville Madison County Public Library's Eleanor Murphy Branch on Saturday, July 21 at 10:00 am in Huntsville, AL.

Frazzled to Fabulous: How to Plan a Party to Remember
I'm super excited about this live presentation (my first in many years), so I'd love to have your support and, more importantly, get the opportunity to meet you in person!  I've got lots of tips that have made all the difference in the world in my party planning and hosting, and I can't wait to share them with you.

Seating is limited. Sign up to attend by calling Eleanor Murphy Branch Library at 256-881-5620. If you call after hours, just leave a message on the answering machine to RSVP.

Monday, March 26, 2012

Easy Kite Brownies on a Stick

It doesn't get any easier than these super cute Kite Brownies on a Stick for spring...especially since Little Debbie does most the work! These would be absolutely perfect for a school kite day!

Kite Brownies on a Stick

Taking a cue from my friend Melissa at Buckets of Grace, who made some adorable skewered Little Debbie hearts for Valentine's Day, I was instantly inspired when I saw these Little Debbie Kite Brownies at my grocery store.

Kite Brownies for School Kite Day

To make this display, I used:
  • Little Debbie Kite Brownies
  • A jar filled with glass beads
  • Bamboo skewers (long and medium lengths)
  • Long lengths of organza ribbon
  • Short strips of a accent ribbon (mine were satin and grosgrain)
I recommend storing the skewers horizontally on a tray and waiting to assemble vertically right before your event. The brownies are soft, and I did have one of the brownies fall off its stick.  However, it held tight for about a hour before that happened. I'm sure your brownies will be snatched up before that happens.

Little Debbie Kite Brownies on a Stick

If you make some Kite Brownies on a Stick, I'd love to see a photo!  Leave a comment on post on my Facebook wall.


Wednesday, November 16, 2011

Candy Acorns for Thanksgiving

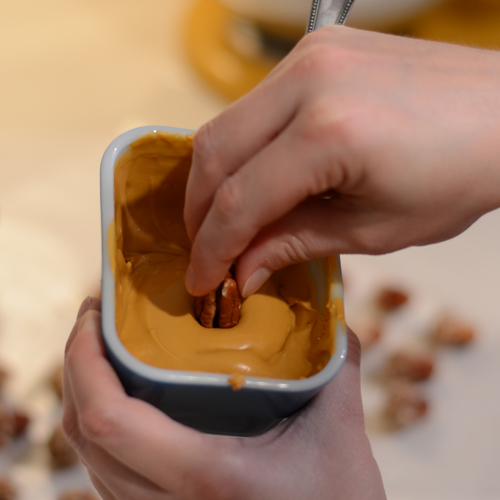
These Candy Acorns are as yummy as they are cute! Butterscotch and toasted pecans make a delightful flavor combination...I can't even begin to describe how good these are!  These acorns are sure to make the perfect decoration for your Thanksgiving treats and fall gatherings.

Candy Acorns with Pecans

I originally saw these cuties on the cover of Sandra Lee Semi-Homemade magazine. The steps outlined in the magazine made the process of creating these Candy Acorns a bit frustrating, so I streamlined the process. Now, they're super simple and joy to make.

Candy Acorns Recipe
40    pecan halves, toasted
1      cup butterscotch morsels, melted
½     cup  finely ground pecans, toasted

With a small amount of melted butterscotch, attach flat sides of 2 pecan halves to make a whole.  Place on a waxed-paper-lined baking sheet in the freezer for 10 minutes to set.

Thanksgiving Butterscotch Pecans

Dip  ⅔ lengthwise of each whole pecan into melted butterscotch and set on waxed paper.  Place in the freezer for 10 minutes to set.

Butterscotch Pecans as Acorns

Dip uncoated ⅓ of pecan into melted butterscotch, and roll in finely ground pecans.  You may want to use your fingers to push the ground pecans into a uniform shape for your acorn tops.

Acorn Pecans Recipe

 Set on waxed paper, and place in the freezer for 10 minutes to set. Enjoy!

Thanksgiving Candy Pecans

These candy acorns are so easy and delicious!  I can't wait to decorate my pumpkin pie with these for Thanksgiving.

Monday, August 22, 2011

How to Have a Successful Yard Sale - Pro Tips

My husband and I are pro yard salers - from both the buying and selling perspective.  We love to load our pockets down with quarters and head out on a Saturday morning for treasures.

Yard Sale Flyers for Free
 
At our own Yard Sale this month, we put all of our years of experience to good use and raked in $913!! What's even more incredible about that is that we didn't have any big-ticket items.  Our most expensive items were
  • $40 - Gigantic framed art piece
  • $15 - Toro weedeater
  • $10 - Toro lawn blower
  • $5 - Headboard/footboard for full-size bed
  • $5 - Collector Barbies, in boxes but obviously opened and LOVED!
  • $1 - 0.50 each for almost everything else
I know you can do just as good or better taking our collective wisdom and running with it.

Here are our tips for for a successful yard sale!

Garage Sale Sign

  • Decide on your #1 Yard Sale goal
    In yard sale speak, this is either to 1) get rid of unwanted things or 2) make money.  Ideally, you want to do both, but knowing what your top priority is ahead of time will help you set a strategy for all of your yard sale preparations, stay focused at the sale, and have no regrets once its over.  If your #1 goal is to get the top price for each of your items, you won't feel bad turning away low-ball offers in the morning.  However, if you ultimately want everything gone, let that stack of books go for $2.  That's better than having to box them back up at the end of the day...why risk not finding another buyer to take them off your lawn?

    Our goal was ultimately to get rid of clutter and not bring anything (well, almost anything) back inside our house, while having a little fun and making some cash in the process.  That's why when we later noticed that a small stereo had been stolen from our sale, our goal kept us from getting upset because we ultimately wanted to get rid of it...besides if someone is so desperate that they need to steal from a yard sale, more power to them! Having a sense of humor is good to have, too!

  • Have way more than you expect to sell
    If you want people to pull over at your sale, you need a lot of stuff to make it worth their while...more than you think you'll sell.  Looking picked over will not be to your advantage, especially late in the day.  Keeping your #1 goal in mind, scour you house with a rutheless eye for stuff to help you reach your target, especially in the last week or two before your sale.  I like to always keep a bag stashed in cabinets or a box hidden under cloth-covered tables around my house for holding yard sale items throughout the year.  When these stashes become unmanageable, it's Yard Sale time!  Then a few weeks before the sale, my husband and I clean out closets, cabinets, and drawers throughout the house. When you start to feel wishy-washy about what should stay or go, break out your #1 priority for the sale, and ask yourself how that item fits with the goal.  That will help you decided whether it goes in the yard sale pile or not. If you still don't have enough stuff for a yard sale, ask a few friends to join in and yard sale with you.

  • One man's trash is another man's treasure - So true!
    You may think to yourself, "This will never sell," or "I'd be embarrassed to put this out...who would want it?" Don't doubt yourself, and just put it out anyway.  Some items that surprisingly have sold well at my yard sales are Martha Stewart Living magazines, half used body sprays and lotions, technical books on dated subjects/concepts, and dingy white t-shirts and dress shirts with ring around the collar.  I always feel the later is a reflection on my poor laundry skills...totally embarrassing to me. Somebody, let me in on that ancient Chinese secret! However, at our sale, I was glad I put them out anyway because almost all of them sold...crazy!  Those shirts alone probably made us at least $20 richer.

  • Look cute, festive, and tidy
    You can really differentiate yourself from other sales here and make it impossible for people to drive by without stopping. Doing this will help you attract a better clientelle, too...people who don't normally yard sale will be willing to stop, and often, they have more cash to spend.  Create a bright, coordinated atmosphere by covering your mis-matched folding tables with dollar-store table cloths.  I'm a cheapsake, so I trimmed some of the plastic table cloths in half to cover smaller tables.  This alone goes a long way.  You can do even more by making a party-style Yard Sale banner to hang (download my free Yard Sale Printables for a template) or by tying a few balloons from Dollar Tree to your mailbox.  When you get your items ready to put out, wipe off any dust or cobwebs...I recommend doing this a week or so before on your bigger items, especially ones that have been in the attic or garage.  I've been known to ignore some interesting items at Yard Sales solely because they were too yucky to put in my car, so I definitely didn't want any deterrents like this at my yard sale. 

    Yard Sale How To Instructions

  • Plan your Yard Sale display ahead of time
    Don't just think you're going to string a line from two trees to hang clothes at the yard sale.  The week before, get the rope out and give it a try.  Often times, you'll find you need a different plan...or wonder, "Where in the world did I put that rope?" These are not mysteries you want to try to solve on the morning of your yard sale.  Maybe you'll want to borrow some extra tables from friends.  We've found that a broom stick between a tree's branches and a ladder makes a really sturdy clothes rack (won't sag all of the clothes together in the middle like a rope).  A piece of paneling or plywood on upside-down buckets or recycling bins can make really nice low tables, too...great for putting toys at kid-level!

  • Merchandise - pretend like you're opening your own Macy's department store for the day
    Think like a store merchandiser, and put some thought into where items should be placed.  I like to put something good like furniture close to the street as a draw, and then have a large, eye-catching item at the back of the driveway to draw people from the street all the way back through my entire stock of goods.  Ever wondered why grocery stores put the milk and eggs at the back of the store?  They want you to walk through the cookie and potato chip isle first, so you'll load up your cart on the way.  Learn from their example!  I had a gigantic framed art piece that I placed toward the back of my yard sale, and it worked like a charm to draw people back to get a good look.  Don't be afraid to rearrange items during the sale to get this effect once you figure out what items keep attracting attention.

    Yard Sale Stickers Price Tags

    If you have the luxury of being able to set everything up for your yard sale in your garage the night before, that's the way to go because you can get super organized! Of course, does that make it a garage sale and not a yard sale?...no worries, these tips still apply!  You want to group like items together to make them easy to find: women's clothes, men's clothes, craft supplies/tools, books, kitchen gadgets, picture frames, electronics, etc. We didn't have that luxury, so our sale was a big disorganized mess at the beginning.  No problem, because that leads to my next tip...

  • Don't let early birds get you frazzled
    In fact, use those early birds to your advantage...they're more than willing to help you bring out and unpack boxes. These people are professionals!  I don't care how early you try to set up before the start-time of your sale, these people will be lurking and ready to pounce.  This can be a little stressful because things won't get put out and organized the way you want, but you'll have all day to get things sorted out...rearranging and looking busy actually attracts more people to stop by.  When dealing with early birds, you'll also be glad you had a #1 goal in mind.  If your main goal is to make money, you won't feel bad turning away low-ball offers.  But, be smart about it!  Be polite and offer to take down their name and number in case that item is still available at the end of the day...you might both come out really happy in this case.

  • Price with your Yard Sale goal in mind
    I'm a big fan of not having anything priced at your yard sale because when people go to negotiate, a lot of times they name a price higher than what I have in mind...SCORE!  Plus, this makes less work for you because you don't have to tag every single thing or reduce the tagged prices as the day goes on. On some big ticket items, you may want to mark a dollar value if you're not willing to accept less than a certain price.  Even if you don't tag, it's good to have some general price guidelines in mind ahead of time, which you can note on signs, such as Books - $1, Magazines $0.25, etc. if you want.  If your #1 goal is to make money, you probably do want to go through the extra trouble to price tag all of your items, though, so you can put some thought into how much each item should sell for.  This makes things fool-proof if you need to step inside and let someone else man the register for a few minutes, too.

    How to Have a Yard Sale

  • Knowing what to say to improve sales
    After years of yard sales shopping, I've witnessed a few techniques that caused me to hand over a little extra cash for items, so of course, I made note!  Apply these in a warm, polite manner, and you'll do well. I don't recommend doing anything that would make you feel smarmy at the end of the day, so ultimately, do what feels comfortable for you.

    • "Whatever you think is fair..." or "Just name a fair price..."
      You may find it hard go with an un-marked pricing style. For cases like this, I recommend placing a few signs up around your sale that say, "Make an offer," to let people know how to approach you.  Then if someone asks you the price of something, break out a variation of, "Whatever you think is fair."  This can stop a low-ball offer in its tracks...works like a charm!  Be prepared for them to say, "I don't know..." To this I just continue with, "Oh, just make an offer that you think is fair." A yard sale customer feels happy when they get something at a price that pleases them, and if they name the price, that is generally what happens.  Plus, remember I said earlier that if I let the customer name the price, they'll generally offer more than I had in mind.

    • "No reasonable offer refused"
      This can really create a buying frenzy, so whether you verbalize this phrase or just put up a few signs at your entrance and "cash register", absolutely use it! (See my free Printable Yard Sales Signs for these.) Keep in mind, you get to decided what's reasonable. If someone throws out an offer that's too low, just politely decline.  In these cases, I might give them a counter offer to let them know where I expect the price to be.

      Yard Sale Signs to Print

    • "Hmmm..." and a ton of awkward silence
      You'll have some customers that won't name a price; use this phrase.  Or if someone names a low-ball price; use it here, too.  This is just a good all-purpose way to encourage them to make an offer or up their price.  I like to throw in a "no" head shake or maybe a crazy confused face along with this for good measure to give the buyer some visual clues as to what I think about their price...seriously, try it.  You'll be shocked at some of the nice offers you get, as a result...the awkward silence is really the key.

    • Use some positive customer quotes to your advantage
      If someone tells you something positive about the sale, use this to whip up a buyer frenzy.  I do this by loudly saying, "Thanks!" in response, and then shouting back to my husband across the entire yard sale, "Did you hear that, Rog?  She said we have the best yard sale prices, she's seen all year."  This with get other yard salers excited, and lets them know that good things are happening right NOW.  Encourage them to snatch things up before they are gone.

    • "Are you looking for anything in particular?"
      Be as helpful as you can to your customers.  I'm not a very pushy person by nature, but if I notice someone is holding a skirt and I have a top that matches perfectly, I'd be doing them a disservice if I didn't at least point it out to them...who am I to keep them from finding their new favorite outfit?! ( ;  This phrase is particularly good to use with early birds, especially if you haven't had a chance to unpack and set every thing up.  Chances are they saw something in your yard sale ad that piqued their interest, so be sure to find out what it is and unpack those things first....whatever they're looking for, help them find it.  A lot of people don't feel comfortable saying that they came solely for XYZ and will just leave...don't let them.

  • Identify unknown or confusing items
    It may be hard for your customers to figure out what something is. Give them some visual clues if you can, and then place a little sign or tag on it stating what it is.  This will go a long way in facilitating the sale of these things, as you won't always have the time to notice someone staring at this item and get the opportunity to explain.  For example, I had a fold-able rack for wrapping paper and ribbon.  Who knows what it is when it's just sitting bare, so I put an almost-gone roll of wrapping paper on it, along with a tag explaining that it was great for Christmas wrapping. I included some large blank price tags and tent signs in my free Printable Yard Sale Signs & Price Tags package precisely for this reason. Noting the history of an item might be helpful for adding value, too...people like a good story. 


    Printable Yard Sale Price Tags for Free

  • Be prepared
    A little preparation will make the big day go a lot smoother and help you sell more.

    • Have a lot of small change on hand...more than you think you'll need.  For our sale, I withdrew $50 from the bank - 1-$10, 2- $5, and 30 - $1 bills.  Then I pulled a bunch of quarters out of my husband's change stash.  Be sure to note how much change you have on hand, so you won't count this in your profit at the end of the day. Also, know that a lot of people will pay with $20 bills.
       
    • Save up lots of plastic shopping bags, as well as some newspaper for wrapping breakables.  Having some spare boxes can help people carry off their treasures.  Offer boxes to customers holding a lot of items, too, to encourage them to buy more than they can easily carry.
       
    • Keep a roll of paper towels or Swiffers around for wiping off dust or cobwebs you might have missed.
       
    • Have an extension cord, power strip, or plug around, so people can try things before they buy.  When people ask if something works, offer them the plug....this will go a long way toward buyer confidence and help you fetch a better price.
     
  • Create the yard sale you'd want to go to
    When it comes to all other yard sale decisions, just put yourself in your clients shoes to help you come to a conclusion.  For example, I'm not a morning person, so I usually hit yard sales up late in the day. If the ad or sign says, it extends until 1:00 or later, then it will make my cut of places to go that day.  Of course, we didn't want to miss out on those early birds either, so we set our yard sale hours for 7:00 am - 2:00 pm.

  • Get creative with your Yard Sale goal - our "FREE HOUR"
    Throughout your sale, make sure you're hitting your goal. Yard Sales are fluid, so don't be afraid to change your strategy midstream.  If something isn't working, try something else.  Toward the end of the sale, we realized we still had a lot of stuff that we'd have to pack up and haul away.  Keeping in mind our #1 goal was to get rid of  clutter, my husband came up with the brilliant idea to do a Free Hour for the last hour of our sale. At this point, we took out a few items that we decided we'd keep or sell on Craigslist. Then when people walked up, we just told them whatever they wanted was free and to take as much as they wanted. I wish we could have bottled the joy people expressed!!  It was absolutely incredible to watch people light up when we told them. We helped them, and they helped us. Such an awesome feeling that I can't even describe it....absolutely one of the best things we've ever done.

    Garage Sale Tips

  • Advertise your Yard Sale
    This is such an important piece of the yard sale puzzle that I'll be devoting an entire post to advertising and signage in the future! (Did I mention my full-time job is in marketing, and that I have a degree in advertising?) But for now the basics...create a Craigslist post, or if your area doesn't have Craigslist, an ad in your local newspaper might be a good bet. Try to think of other advertising options you have, such as classified listings at work or your church bulletin.

  • Schedule end-of-sale charity pick-ups earlier in the week
    It's pretty hard to find a charity that will do same-day pick up of your leftover items, at least it was in our area. From talking with many operators, I learned it's best to schedule these at least a week in advance, so they'll show up shortly after your sale ends.  If you don't mind making a delivery, our Salvation Army had the most convenient Saturday drop-off hours for us, as they were open a lot later into the afternoon.

  • Have fun!
    We met lots of great people at our yard sale and had a great time chatting. Plus, I always enjoy seeing something I really like find a new home that will love and enjoy it...sometimes, that makes it a lot easier to let things go.
Do you have any great Yard Sale tips and tricks?  I'd love to hear them!!  Please post a comment, share on Facebook or Twitter, or shoot me an email at Betsy@BellyFeathers.com.

Printable Yard Sale Signs Free 11x17 inches

Be sure to download my cute Printable Yard Sale Signs and Price Tags, too!  They're FREE!

Free Printable Yard Sale Signs & Price Tags

When you have cute Yard Sale Signs, you can attract a better clientele.  That's why I decided to design these Printable Yard Sale Signs & Price Tags for my own garage sale, and now, I'm sharing them with you for FREE!!

Free Printable Yard Sale Signs

I've been designing more and more Printable Party Invitations and Party Supplies for my customers over the last few months.  They're a great way to get a variety of highly coordinated party supplies at a small flat rate.  Once you get your Printable PDF, you can print unlimited copies of the items you need. Plus, they give you the flexibility to get creative and use the graphics in new ways...so much fun!

Yard Sale Stickers and Price Tags

I know I had a fantastic time playing with my Yard Sale Printables.  I had originally designed some graphics for small circular price tags, and then I discovered they would make perfect cards for displaying (and keeping together) earrings for sale! See what I mean about getting creative and having fun?! My jewelry looked so cute on these cards that all of my pieces were snatched up within the first couple of hours...part of that had to be due to the presentation.

Printable Yard Sale Signs Free

Check out my Tips for a Successful Yard Sale.  My husband and I made $913 at our yard sale this month!!

What are you waiting for?!
  Download these Printable Yard Sale Signs and Price Tags now! I promise you'll get a lot of compliments...I did!

Monday, May 2, 2011

DIY Mexican Paper Flags: Easy Papel Picado Alternative

When I was planning my Cinco de Mayo Margarita Party, I immediately decided I wanted Mexican Paper Flags, also known as papel picado. If you've ever seen photos of these flags hanging over streets in Mexico, you know how festive they look. However, these can be kind of pricy to purchase, as they should be considering the intricate designs cut into the tissue paper by hand.

Cinco de Mayo Decorations
Photo by Sarah Brewer of Click Photo Designs

My easy alternative was inspired by a DIY Bunting Tutorial on Project Wedding. I love the clean lines! You can leave your flags blank or stamp a pretty design on them like I did.

DIY Mexican Paper FlagsHow to Make Mexican Paper Flags

Supplies Needed
  • Tissue paper in multiple colors
  • Lever-style paper trimmer or scissors
  • Rubber stamp (optional)
  • Ink (optional)
  • Glue stick
  • Twine


  1. Cut multiple sheets of tissue at once into 8x6" strips using a lever paper trimmer or scissors. Fold in half to create 4x6" flags.

  2. Using a rubber stamp and ink, stamp a design onto your folded flags. I stamped a flower in the upper left corner of all my orange flags, in the center of all my yellow flags, and in the bottom right of all my green flags for variety.

    How to Make Mexican Flags

  3. Unfold one of the flags, and run a glue stick around the four edges of the inside of the bottom half.

    How to Make Papel Picado

  4. Place a length of twine in the fold of the flag, and fold in half to adhere the flags edges together. I used Divine Twine in Lemon by Whisker Graphics.

    How to Make Flag Garland

  5. Leaving 2-3" section of twine from the edge of this flag, adhere the next flag onto the twine. Repeat with desired amount of flags.

    DIY Tissue Paper Flags

  6. Hang and enjoy!

Hanging Papel Picado

DIY Papel Picado

If you missed the photos from my Cinco de Mayo Margarita Party, be sure to check them out!

Hanging Mexican Paper Flags

I'd love to see photos if you make your own Mexican Paper Flags!


Wednesday, February 9, 2011

Care Package Ideas for Homemade Goodies

Someone my husband and I love needed a little cheering up, so I decided to put together a care package of my homemade Classic Peanut Butter Cookies.

Care Package Ideas Homemade

I couldn't put a gift together without a homemade tag! I thought this little "Donut Be Sad" stamp was so adorable, and it makes me smile to see it every time. There's just something endearing about a smiling donut with a tear....Don't you think?

Donut Be Sad Gift Tag with Twinery Twine

How to Ship Cookies:

  • Try to bake your cookies within 24 hours of shipping.

  • Let cookies cool to room temperature before packaging.

  • Place cookies in an air-tight container.

  • Put waxed paper or parchment between each layer of cookies to keep them from sticking to each other. (I just recycled the parchment paper I baked the cookies on for this.)

  • If cookies don't completely fill the container, add shredded or crumpled waxed paper, parchment paper, or cupcake liners to fill the gap.

  • Place container in a shipping box with 2-3 inches of packing on all sides to keep cookies from breaking during shipment.

  • If shipping the next day, freeze your box of cookies overnight to ensure freshness longer. If you're shipping during the cold-weather months, that will help, too.

  • Mark the box FRAGILE.

  • It's best to send your cookies on Monday or Tuesday to ensure the cookies don't sit in a post office or warehouse over a weekend and start to get stale.

  • I recommend USPS Priority Mail (2-3 day delivery) as a fairly fast and economical shipping method. 

How to Ship Cookies Homemade

 Here are two guides for shipping other handmade treats:

Here's one last look at my care package before it goes into its shipping box and the freezer.  I just got this Caribbean blue twine from The Twinery this week, and it matched my tag so perfectly!

Mailing Cookies Homemade

Do you have any tips for shipping home-baked treats?


Monday, December 20, 2010

Wrapping Paper Scraps: A Husband's Dream

Here's one of my favorite present wrapping tips: create a bag of wrapping paper scraps. As I cut wrapping paper off the big rolls, I save the leftover pieces after wrapping a gift and roll them up inside of a recycled shopping bag for later use on smaller gifts.

Christmas Wrapping Paper Scraps
 
My husband thinks this is the best present wrapping innovation EVER because it saves him so much time when wrapping presents. He can just hunt around in the bag for a scrap about the size of the gift he needs to wrap.  He probably wraps 90% of his gifts out of this bag. The littlest scraps are usually perfect for small stocking stuffers. (At our house, we usually wrap about half of the items inside our Christmas stockings.)

Recycle Wrapping Paper Scraps

I try to keep the bag organized with Christmas wrapping paper on one side and paper for birthdays and other occasions on the other side.  I used a smaller recycled shopping bag inside the big one to help keep them separate.  It's also helpful if you can find a big shopping bag with long handles, so you can carry the bag even if you have long scraps inside.  I hang my bag on a hook in my craft closet when not in use, so the long handles are great for that, too.

Do you have any present wrapping tips to share?


Thursday, December 16, 2010

Decorating Christmas Packages and
2010 Post Office Shipping Deadlines

If you're going to send packages this Christmas, add a little pizazz, and get them to the post office soon! Here are some important deadlines if want your Christmas packages delivered before December 25th via the US Postal Service.

Post Office Christmas Package deadlines:
  • Monday, December 20 - First Class Mail
    (cheaper option, maximum weight of 13 oz)
  • Tuesday, December 21 - Priority Mail
More USPS shipping details.

When shipping personal packages, I always like to make them festive.  One of my favorite ways to do this is with paper doilies.  I usually get mine at the Dollar Tree, and I use them for the address labels and as decorative touches.

Christmas Package Doily

Using circle doilies as labels are fun because you can write your return address in an arc around the top edge of the doily for a super unique presentation.

Christmas Package Doily Mailing Label

You'll notice that my boxes are drenched in packing tape. It's really important to cover your entire doily with tape to make sure none of the intricate details get snagged in transit.

Christmas Package Decorations

To cover ugly labels or old bar codes on my recycled boxes, I like to use scraps of leftover wrapping paper, which can add another pop of color.  This box definitely looks homemade!

Wrapping Paper Christmas Package

Loaded up in the car and ready to go to post!

Christmas Post Office Packages

Do you have any tips for making holiday packages festive?

Wednesday, November 17, 2010

Graceful Hostess Tip:
When Asked, Bring Your Signature Dish

Graceful Hostess Tips
Ideas for hosting with style and elegance

At pot-luck events, you have the opportunity to exhibit graceful hostess skills even if you're not the organizer. This is especially true when you're asked to bring one of your signature dishes.  If at all possible, say, "Yes!"

If someone makes a special request, it's because they love your dish, the way you present it, and possibly even how it livens the crowd.  So, be flattered, and try to oblige.

Yesterday was our Thanksgiving lunch at work, and I was asked to bring my famous Fruit Tea by the lunch's organizer, Linda.  Fruit Tea is not exactly a perfect fit for a fall gathering, but I was thrilled to receive the special request.  I found a way to make the tea fit in with the festivities by decorating my dispenser with a cute little fall label that I hand-stamped with a little acorn in fall colors.

Thanksgiving Punch Fruit Tea

Thanksgiving Menu Card Label

I wish you could see how excited my co-worker Linda is on days when I bring in Fruit Tea!  There's a lot of clapping. giggling with excitement, and a special Fruit Tea dance....that's right, a Fruit Tea DANCE!!!  This time I wanted to do something a special to make the Fruit Tea happiness last a few days longer.  I made a little gift pitcher for Linda, so she could take home all of the leftover Fruit Tea.

Pitcher with Hand-stamped Tag for Hostess Gift

My husband used a Dremel to drill a small hole in the pitcher's handle big enough for a binder clip.  I thought a binder clip would be a perfect way to attach the sparkly handmade "Property of" tag to the pitcher, so it could be easily removed when the pitcher needs to be washed.  Plus, the clip will let Linda attach the tag to whatever she needs (luggage, cake carrier, etc.).  I also had the tag laminated, so it won't get damaged by condensation or drips.

Property of Tag for Hostess Gift

So, what's your signature dish?


All contents Creative Commons licensed. Betsy Pruitt of Belly Feathers.

Please give credit to Betsy Pruitt of Belly Feathers and provide a link back to the page containing the content when you use ideas, text, and photos from this site. Thanks!

Full Disclosure: If you see a link to Amazon on this blog, it is probably a link through their affiliate program, meaning I would receive a teeny tiny commission on any sales from that link. Please know I only write about items that I think would interest my readers and never for commission on these items.